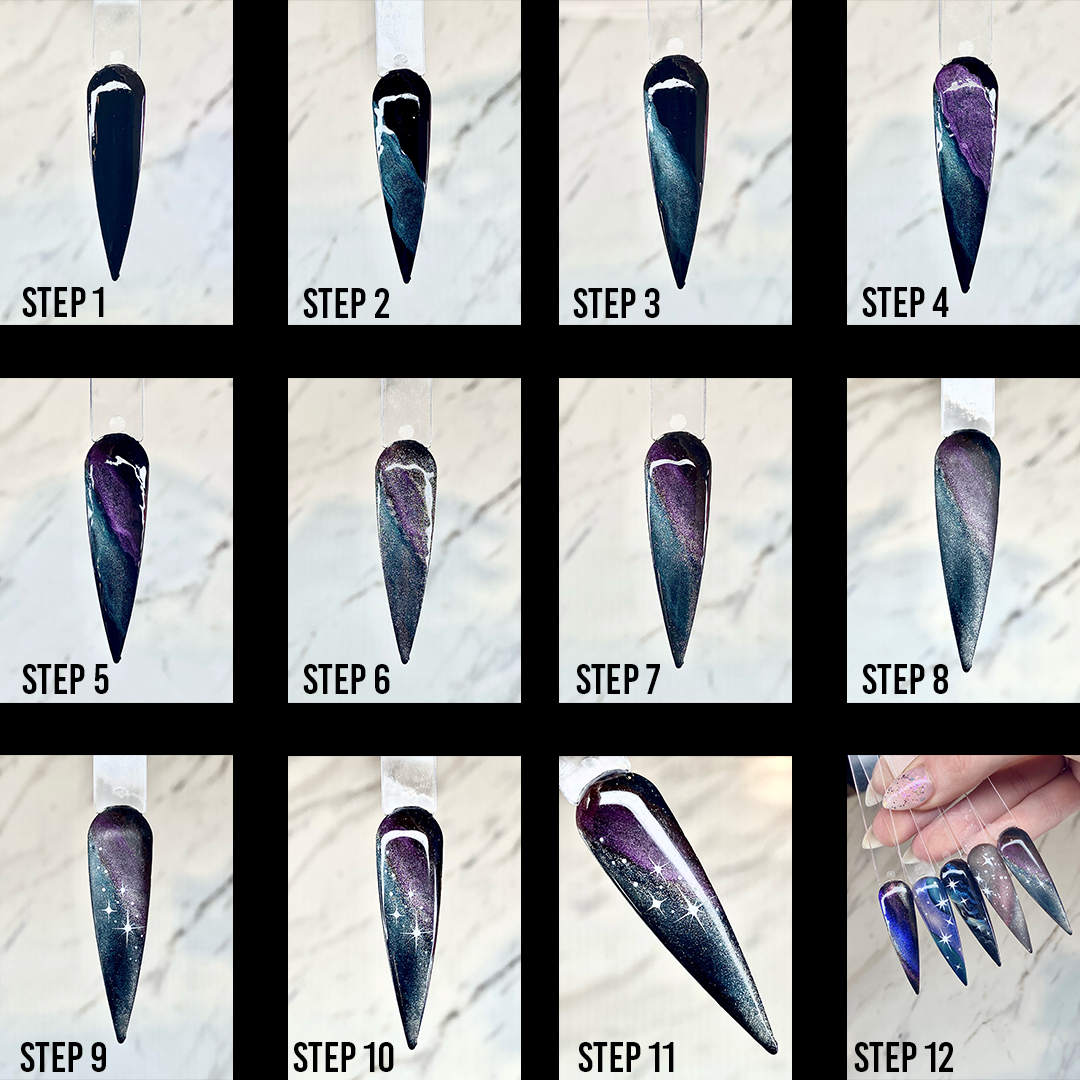
- First, apply a black base all over the nail. We recommend something with one-coat coverage to keep the nail from getting bulky, like the Ugly Duckling Gel Polish #043.
- Choose 2 cat-eye colours for your galaxy. Blues, purples, and greens are a good choice – we went with Aprés HypnoGel #01 (Blue) and #05 (Purple). Apply your first colour to create a flowing stripe, and without curing, use a cat-eye magnet to distribute the magnetic particles as desired for a multi-dimensional effect. Cure for the recommended time.
- Apply your second colour on a different part of the nail using the same technique. If you would like, you can layer more cat-eye colours for unique effects.
- Apply a sheer silver cat-eye all over the nail – the Aprés Platinum Glitter Bomb HypnoGel is perfect for this. Without curing, use your cat-eye magnet to layer the effect over your previous colours. This will further enhance the dimensionality and give your design a starry, galactic look. Cure for the recommended time.
- For the next step, you will need a smooth surface to work on. We used the Light Elegance Flat Matte top coat. Cure for the recommended time, and remember to cleanse the surface if not using a tack-free matte top coat.
- Using a dotting tool like the En Vogue Stylus, you can create stars by randomly placing small dots of varying sizes wherever you like. For a starburst effect, apply a slightly larger dot and use a clean detail brush such as the Light Elegance Swirly brush. Start at the center of the dot and drag the product outwards in a straight line. Do this four times (top, bottom, left, and right). If desired, you can add shorter lines in between for more detail. Cure fully once satisfied with the design.
- Finally, you can complete the design with your top coat of choice. This design will work with a shiny, matte, or even sparkly finish – we are obsessed with the Fuzion Shimmer FX Topcoats, and they are even galaxy-themed!
Galaxy Nails Tutorial


